Published on May 30, 2025
Last updated: May 30, 2025 · ⏱ 2 min read
No Scrub Needed: Clean Your Burnt Pan Naturally
Understanding the Challenge of a Burnt Pan
Burnt pans are a common issue in many kitchens, and they can be a source of frustration for home cooks. Whether you accidentally left a pot on the stove for too long or a dish overflowed, the result is often a stubborn layer of burnt residue that seems impossible to clean. Traditional scrubbing methods can be tedious and may not yield the desired results. Fortunately, there’s a simple and effective way to tackle this problem using baking soda and vinegar, two household staples that are not only safe but also environmentally friendly.
Why Baking Soda and Vinegar Work
Baking soda, or sodium bicarbonate, is a mild abrasive that can help lift dirt and stains from surfaces. Its alkaline nature allows it to break down tough grime, making it easier to scrub away. On the other hand, vinegar is acidic and can dissolve mineral deposits, grease, and food residues. When combined, these two ingredients create a chemical reaction that produces carbon dioxide bubbles, which can help to loosen the burnt material from the pan. This method not only cleans effectively but also avoids the use of harsh chemicals that can be harmful to both your health and the environment.
Gathering Your Supplies
Before you begin the cleaning process, it’s important to gather all the necessary supplies. Here’s what you will need:
- Baking soda
- White vinegar
- Water
- A non-abrasive scrubber or sponge
- A measuring cup
- A wooden spoon or spatula (optional)
Having these items ready will make the cleaning process smooth and efficient.
Step-by-Step Guide to Cleaning Your Burnt Pan
Now that you have your supplies, it’s time to get to work. Follow these steps to clean your burnt pan effectively:
Step 1: Assess the Condition of Your Pan
Before you start, take a moment to assess the level of burning and residue on your pan. If the burnt material is extensive, you may need to repeat the cleaning process. However, for most cases, the following methods will be effective.
Step 2: Create a Baking Soda Paste
In a small bowl, mix about 1/2 cup of baking soda with a few tablespoons of water to form a paste. The consistency should be thick enough to adhere to the surface of the pan without dripping off. This paste will serve as your scrubbing agent.
Step 3: Apply the Baking Soda Paste
Spread the baking soda paste evenly across the burnt areas of the pan. Use the wooden spoon or spatula to gently press the paste into the grime, ensuring that it covers all the affected areas. Allow the paste to sit for at least 15-20 minutes. This waiting period gives the baking soda time to penetrate the burnt residue and loosen it.
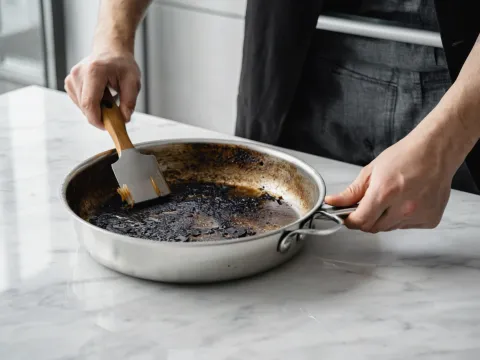
Step 4: Add Vinegar
After the paste has had time to work, it’s time to introduce the vinegar. Pour a small amount of white vinegar over the baking soda paste. You will notice a fizzing reaction as the two ingredients interact. This bubbling action is a good sign, as it indicates that the baking soda is working to lift the burnt food particles.
Step 5: Scrub the Pan
Using a non-abrasive scrubber or sponge, begin to scrub the pan gently. You should see the burnt residue starting to lift away. Focus on any stubborn spots, applying a bit more of the baking soda paste if necessary. If the burnt residue is particularly stubborn, you may need to let the vinegar and baking soda sit for a few more minutes before scrubbing again.
Step 6: Rinse and Inspect
Once you’ve scrubbed the pan thoroughly, rinse it under warm water to remove any remaining baking soda and vinegar. Inspect the surface to ensure that all the burnt residue has been eliminated. If any stubborn spots remain, repeat the process by applying more baking soda and vinegar.
Step 7: Final Clean and Dry
After you’ve successfully removed all the burnt material, give your pan a final wash with dish soap and warm water. This step ensures that any remaining residue from the cleaning process is gone. Dry the pan with a soft cloth or paper towel to prevent water spots.
Preventing Future Burns
Now that you’ve learned how to clean a burnt pan effectively, it’s also important to take steps to prevent future burns. Here are some tips to keep in mind:
- Monitor cooking times closely, especially for foods that can easily burn.
- Use a timer to remind yourself when to check on dishes that require prolonged cooking.
- Consider using lower heat settings for dishes that tend to stick or burn easily.
- Regularly season and maintain your cookware to create a non-stick surface.
By following these tips, you can help keep your pans in great condition and reduce the chances of dealing with burnt food in the future.
The Benefits of Using Natural Cleaners
Using baking soda and vinegar as cleaning agents offers a powerful, eco-friendly alternative to harsh chemical cleaners. Baking soda is a gentle abrasive that helps lift grime and neutralize odors, while vinegar’s natural acidity breaks down mineral deposits, grease, and bacteria. Together, they create an effective cleaning duo that’s safe for most surfaces in your home.
Beyond their cleaning power, these natural ingredients are non-toxic and safe for use around children and pets. They’re also budget-friendly and easy to find, making them ideal for anyone looking to reduce their environmental impact while maintaining a clean home. By incorporating natural cleaners into your routine, you not only protect your health but also contribute to a more sustainable lifestyle.
FAQs: Burnt Pan Cleaning

Written by Soufyan from GrowToGrub
Soufyan is a gardening educator and founder of GrowToGrub. Through simple guides, easy recipes, and practical life hacks, he helps everyday growers turn small spaces into sustainable, delicious, and chemical-free living.