Published on May 17, 2025
Last updated: May 17, 2025 · ⏱ 3 min read
Turn Kitchen Waste into Compost Easily
Introduction to Composting with Kitchen Scraps
Composting is an age-old practice that has gained momentum in recent years, particularly among those looking to reduce their carbon footprint and embrace sustainable living. By creating a DIY compost bin using kitchen scraps, you can significantly decrease the amount of waste that ends up in landfills while simultaneously enriching your garden with nutrient-dense compost. This article will guide you through the process of transforming your vegetable peels, coffee grounds, and other organic waste into valuable compost, benefiting both your plants and the environment.
Why Composting is Essential for a Sustainable Lifestyle
Composting serves multiple purposes that extend beyond simply recycling kitchen waste. First and foremost, it helps reduce the volume of waste sent to landfills, which is crucial for minimizing greenhouse gas emissions. When organic material decomposes in landfills, it produces methane, a potent greenhouse gas contributing to climate change. By composting, you can mitigate this impact.
Moreover, composting enriches the soil, improves its structure, and enhances its ability to retain moisture. This is particularly vital in the face of climate change, where extreme weather patterns can lead to droughts or heavy rainfall. Healthy soil supports robust plant growth, leading to increased crop yields and healthier gardens.
Additionally, composting encourages biodiversity in your garden. The rich microbial life that develops in compost supports various beneficial organisms, from earthworms to beneficial insects, which play crucial roles in maintaining a healthy ecosystem. Thus, composting is not just a beneficial practice for your garden; it’s a vital step towards a more sustainable lifestyle.
Essential Materials for Your DIY Compost Bin
Creating a compost bin doesn’t require elaborate materials or tools. Here’s a list of essential items you will need to get started:
- Compost bin or container: You can purchase a compost bin or create your own using materials like wooden pallets, wire mesh, or even a plastic storage bin. The key is to ensure proper airflow and drainage.
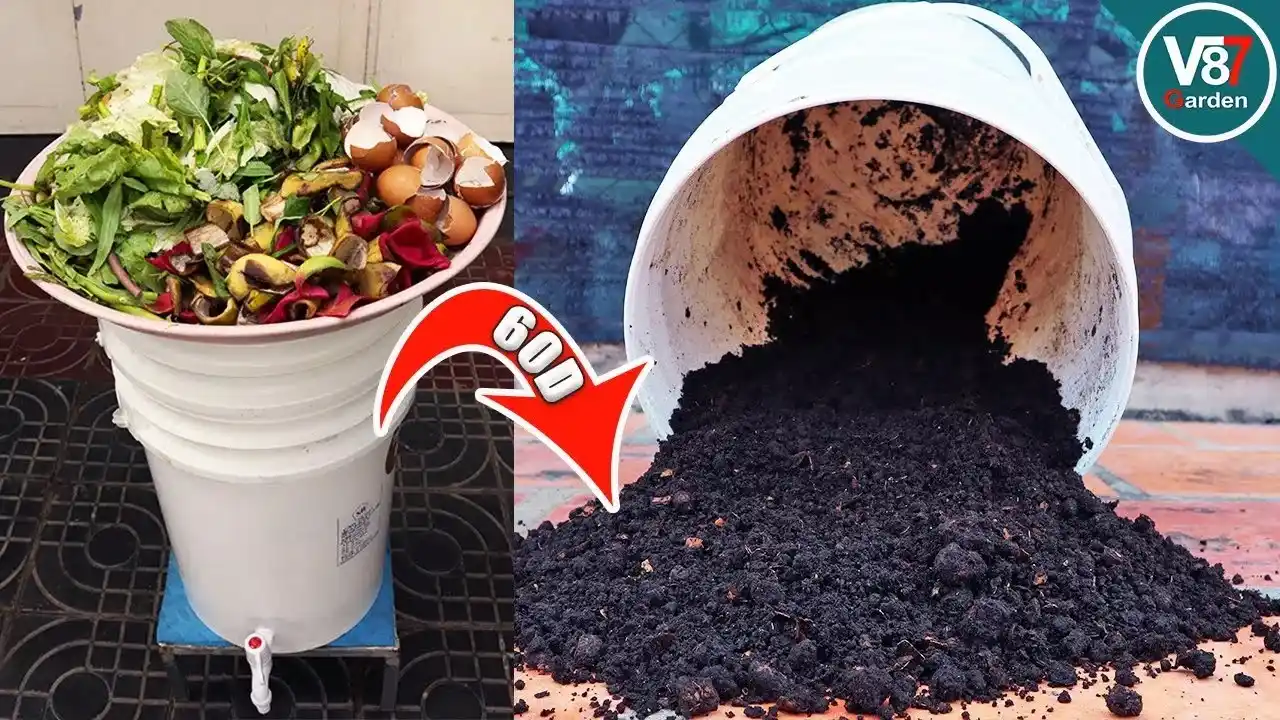
- Kitchen scraps: Gather vegetable peels, fruit cores, coffee grounds, eggshells, and other organic waste. Avoid meat, dairy, and oily foods, as they can attract pests.
- Browns and greens: For a balanced compost, include a mix of 'greens' (nitrogen-rich materials like grass clippings and kitchen scraps) and 'browns' (carbon-rich materials like dry leaves, cardboard, and shredded newspaper).
- Water: Moisture is essential for the decomposition process. Keep your compost damp but not soggy.
- Garden tools: A pitchfork or shovel will help you turn the compost and aerate it, promoting faster decomposition.
Steps to Create Your DIY Compost Bin
Now that you have your materials ready, let’s dive into the step-by-step process of creating your DIY compost bin.
Step 1: Choose the Right Location
Select a well-drained, sunny spot in your yard for your compost bin. Sunlight helps to warm the compost, which accelerates the decomposition process. Ensure the location is easily accessible for adding scraps and turning the compost.
Step 2: Build or Set Up Your Compost Bin
If you’re using a pre-made compost bin, follow the manufacturer’s instructions for assembly. If you’re building your own, construct a bin that allows for airflow. For instance, a simple structure made from wooden pallets can be effective. Ensure it’s at least three feet wide and tall to maintain heat and moisture.
Step 3: Start Layering Your Ingredients
Begin by adding a layer of coarse materials like twigs or straw at the bottom of your bin. This promotes airflow. Then alternate layers of greens and browns, ensuring a roughly 2:1 ratio of browns to greens. This balance is crucial for effective composting.
As you add kitchen scraps, chop them into smaller pieces to speed up decomposition. You can add a handful of soil or finished compost to introduce beneficial microorganisms that will aid in breaking down the materials.
Step 4: Maintain Your Compost
To ensure your compost is breaking down efficiently, turn it regularly with a pitchfork or shovel. This aerates the pile and speeds up the decomposition process. Aim to turn your compost every couple of weeks, and monitor its moisture level. If it appears dry, add a little water, and if it’s too wet, add more browns to balance it out.
Step 5: Know When Your Compost is Ready
Your compost will typically take anywhere from a few weeks to several months to mature, depending on factors such as temperature, moisture, and the materials used. You’ll know it’s ready when it resembles dark, crumbly soil and has an earthy smell. At this point, you can use it to enrich your garden beds or potted plants.
Benefits of Using Your Homemade Compost
Using your homemade compost provides numerous benefits for your garden:
- Nutrient-Rich Soil: Compost adds essential nutrients to your soil, promoting healthy plant growth.
- Improved Soil Structure: It enhances soil aeration and water retention, reducing the need for frequent watering.
- Reduced Need for Chemical Fertilizers: Compost naturally fertilizes your garden, minimizing reliance on synthetic options.
- Waste Reduction: Composting kitchen scraps and yard waste helps divert organic matter from landfills, contributing to environmental sustainability.
- Encourages Beneficial Microorganisms: Compost supports a healthy ecosystem within your soil, helping plants resist disease and pests more effectively.
Incorporating your own compost into the garden not only boosts plant vitality but also supports a more eco-friendly and self-sufficient gardening practice.
FAQs: Compost Bin at Home

Written by Soufyan from GrowToGrub
Soufyan is a gardening educator and founder of GrowToGrub. Through simple guides, easy recipes, and practical life hacks, he helps everyday growers turn small spaces into sustainable, delicious, and chemical-free living.